If you’ve limited yourself to a set of off-the-shelf window coverings, finding the perfect fit can be a challenge. The kind of pre-built cutdowns offered by big box stores never quite look right. That’s why we do everything custom at Blindsgalore. The biggest issue you’ll see with stock blinds is that they’re often too long, leading to heavy, oversized stacks at the bottom of your window. Not only are these larger stacks obstructive, but they also leave your windows blinds too heavy to lift. This may leave you wondering how to shorten the blinds or adjust them yourself.
Well, yes. It is technically possible to shorten your blinds using a DIY approach. However, before you break out the tools and start trimming away, it’s essential to consider whether this is the best solution for your situation. While shortening your blinds might seem like a quick fix, it can come with risks and challenges that may make replacing them a more attractive option in the long run. Let us be clear: your
first and only step should be ordering a custom replacement. If you’re determined to shorten the window blinds yourself, let’s discuss when it might be necessary and which types of blinds can be shortened. You’ll also find a step-by-step guide on how to shorten your blinds length.

![]()
Can You Shorten Blinds at Home Using a DIY Approach?
It seems like the DIY spirit is alive and well. We understand that, obviously. It makes sense to take matters into your own hands. Why hire a professional if all it takes is a little bit of elbow grease? Well, that, a few basic tools and a willingness to learn. Please remember it is crucial to approach this project with a healthy dose of caution. Shortening blinds isn’t as simple as it might seem and there are several risks and challenges to keep in mind.
- ● Blinds are delicate. Inside the headrail, you’ll find fragile mechanisms that require precise measurements and careful handling. One wrong move could lead to a set of blinds that no longer function properly.
- ● Shortening blinds varies depending on the type of blinds you have. Some styles, such as vertical or mini blinds, may be more forgiving than others, like real wood blinds. Again, this has the potential to cause a costly mistake.
- ● Your blinds may need special care. Research your specific type of blinds and follow the instructions that were included with the product first. Don’t forget, you can always contact our in-house team of design and service experts if you need assistance or advice.

When is it Necessary to Shorten Blinds?
In addition to providing light control and privacy, window blinds are meant to frame your window. They should not obstruct your window. We don’t want another wall; we want a gateway for sunlight and fresh air. If your blinds obstruct your view when fully extended, there is a problem. Blinds that are larger than necessary will make an unsightly, impenetrable pile of unnecessary slats at the bottom of the window. Not only does that look bad, but it’s also a potential fire hazard. Not to mention, more slats mean more weight. That’s going to put extra strain on them every time you lift and lower. When fully drawn, your blinds should stop perfectly at the bottom of your window for the best look and the best performance. Your home, and everyone in it, will appreciate it. Trust us.

What Types of Blinds Can be Shortened?
The short answer, no pun intended, is that you can adjust window blinds with slats. Shades aren’t so easy, but it is possible to shorten vertical and horizontal blinds. Determine if your blinds match either of the descriptions below.
Vertical Blinds
Typically covering sliding glass doors or patios, vertical window blinds are made up of vertical slats that hang down from a track at the top of the window frame. They are often violently thrown to the side during barbeques and get-togethers as someone barges out the door. Sound familiar? This often leads to twisting or missing slats. While they can’t necessarily be shortened, you check out our checklist for vertical blind repair if they are giving you trouble.

![]()
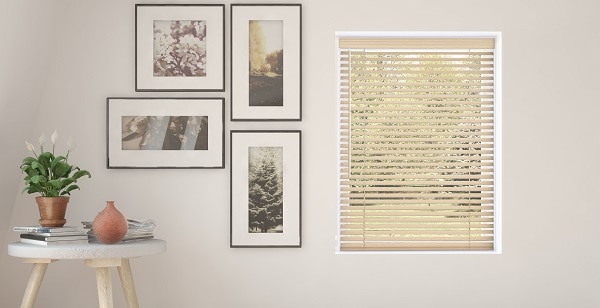
Horizontal Blinds
Quite possibly the most popular way to cover your windows. Wood blinds, faux wood blinds, venetian blinds, and mini blinds are all types of horizontal blinds. Anything with traditional slats falls under this category. When purchased off the shelf, they are usually cut-to-size. If they were too wide, you’re usually left with an odd number of hanging strings. Too long? You’re stuck with an unsightly stack sitting like a large weight at the bottom of your window. We’ll address how to handle shortening these blinds below.

![]()
While the DIY approach can be tempting, weighing the potential benefits against the risks is important. Shortening your blinds at home might save you money upfront, but if the process goes awry, you may end up needing to replace them anyway. Plus, there’s the value of your time and effort to consider. Is it worth the hassle of tackling this project yourself, or would it be more efficient to invest in a quality replacement from the start?
How to Shorten Window Blinds: Step-by-Step
If you’ve decided to take on the challenge of shortening your blinds yourself, it’s essential to approach the process with patience and precision. This is a delicate operation that requires careful attention to detail. Our tips for vertical blinds can be found above. These tips are applicable to horizontal window blinds only.
Step 1: Gather Your Tools
Before you begin, make sure you have the following tools on hand:
● Measuring tape
● Pencil or marker
● Scissors or a sharp utility knife
● Flathead screwdriver
● Pliers
● Ladder or step stool (if necessary)
Step 2: Measure and Mark
Remove the blinds from the window brackets and start by measuring the desired length. Use a measuring tape to determine how much excess length you need to remove and mark the spot with a pencil or marker. Double-check your measurements for accuracy.
Step 3: Remove the Bottom Rail
Using a flathead screwdriver, carefully remove the caps or plugs covering the strings on the bottom rail of your blinds. Once exposed, untie or release the knots holding the strings in place. This will allow you to slide the bottom rail off the strings and remove it from the blinds. Don’t lose any small pieces!
Step 4: Cut the Strings
Find the mark you made for the desired length. Carefully cut the strings at this mark using scissors or a sharp utility knife. Sharp is important to avoid any frayed edges. Take your time and ensure each string is cut evenly to maintain the balance and functionality of your blinds.
Step 5: Remove Excess Slats (if necessary)
If you’re shortening your blinds significantly, you may need to remove some of the excess slats. This will avoid leaving you with a massive stack in your window. Simply slide the slats off the strings until you reach the desired length. Proceed with caution. Remember that removing slats will affect the fullness and appearance.
Step 6: Reattach the Bottom Rail
Once you’ve cut the strings and removed any excess slats, slide the rail back onto the strings Make sure it is evenly positioned. Tie a knot to secure the strings. We recommend using pliers to pull them as tight as possible. Trim any excess string and replace the caps or plugs to conceal the knots.
Step 7: Test and Adjust
With the bottom rail reattached, carefully test your blinds to ensure they function properly. Be careful with your first use. Try them out several times to check for smoothness. If you notice any issues, such as difficulty lifting or unevenness, you may need to make minor adjustments to the string tension or bottom rail position.

![]()
Precautions to Keep In Mind When Shortening Blinds
While shortening your blinds may seem appealing at first, remember that a DIY approach has risks and drawbacks. From uneven cuts and damaged slats to the sheer time and effort required, shortening your blinds can quickly become a frustrating. If you’re losing your cool, we recommend stopping and evaluating before continuing. Learning how to remove slats from blinds by hand is a complex and potentially risky undertaking. There is a reason there are professionals that do this. Minor errors or missteps can lead to damaged or malfunctioning window treatments. Don’t say we didn’t warn you!
Really, though. Why struggle? Invest in a quality, custom replacement. Upgrade. Make it motorized. Why not? With a wide selection of styles, materials, and customization options, we make it easy to find the perfect blinds to fit your windows and enhance your décor. No stress, no hassle, just beautiful new window coverings.
![]()

![]()
Don’t settle for the challenges and potential disappointment of shortening your blinds yourself. Choose the reliability, beauty, and convenience of quality custom window coverings. You’ll enjoy them for years to come.
Looking for more solutions? Read our Five Easy Fixes for Your Window Treatments
FAQs
Shortening horizontal blinds (wood, faux wood, mini blinds) requires careful disassembly and precision:
1. Gather necessary tools: Measuring tape, pencil/marker, sharp scissors or utility knife, flathead screwdriver, pliers, and a step stool if needed
2. Remove the blinds from window brackets and place on a flat, clean surface
3. Measure the desired length from the headrail to where you want the blinds to end, typically just above the windowsill
4. Remove the bottom rail plugs using a flathead screwdriver to expose the lift cords and ladder strings
5. Untie the knots holding the strings in place to release the bottom rail
6. Mark your cutting point where you want the new length to be
7. Cut the strings at this mark using sharp scissors or a utility knife (sharpness is important to prevent fraying)
8. Remove excess slats by sliding them off the strings until you reach the desired length
9. Reattach the bottom rail by sliding it back onto the strings and positioning it evenly
10. Retie the knots using pliers to pull them tight, then trim excess string
11. Replace the caps or plugs to conceal the knots and secure the strings
12. Test operation carefully to ensure smooth functioning
For cordless blinds, the process is similar but requires additional care when handling the spring mechanism that replaces traditional cords.
For roller blinds, excess length is generally not problematic:
– The excess fabric simply remains rolled around the tube at the top and isn’t visible when the blind is extended
– You don’t need to roll the blind out to its full length – just stop at your preferred position
– This “extra” material can actually be beneficial if the bottom edge becomes damaged, as you can cut off the damaged portion and reattach the bottom rail
However, for horizontal blinds with slats, excessive length creates several issues:
– Creates unsightly, bulky stacks at the bottom of windows that obstruct views
– Adds unnecessary weight, making blinds harder to lift and causing strain on the operating mechanism
– May pose a potential fire hazard with too many stacked slats
– Puts extra stress on lifting mechanisms during daily operation
The ideal blind length stops precisely at or just below your windowsill for optimal appearance and functionality.
Yes, you can cut blinds that are too wide, but it’s significantly more complex than adjusting length and carries higher risk:
For horizontal blinds:
– Most have a “safe cutting zone” of 4-8 inches on each side before reaching the internal mechanisms
– Cutting requires careful measurement and specialized tools like a miter saw or hacksaw
– You must avoid cutting into areas containing lift cords or tilt mechanisms
– Once cut beyond certain points, the blinds become permanently damaged
For roller blinds:
- Measure between brackets and mark cutting points on both the fabric and tube
- Cut the fabric with a sharp utility knife using a ruler as a guide
- Cut the roller tube with a hacksaw at the marked points
- Sand cut edges for a clean finish
For vertical blinds:
– Requires cutting the headrail with a hacksaw after removing slats and end caps
– Must carefully remove the plastic slat holders that will be eliminated
– Generally more successful than horizontal blind width reduction
Many manufacturers and experts recommend purchasing custom-sized blinds rather than attempting to cut width, as mistakes can render the entire blind unusable.
When blinds are too short for your windows, you have several practical solutions:
If blinds are too narrow for brackets:
– Move the mounting brackets closer together if possible
– Use spacer blocks or shims to reduce the distance between brackets
– Create custom spacers from timber to push brackets inward from the window frame
– For an 8mm gap, use materials like wood, plastic, or even stacked business cards as spacers
If blinds don’t provide adequate coverage:
– Change from inside-mount to outside-mount installation for greater coverage
– Install the brackets on the top of the window recess rather than the sides
– Add a valance or decorative molding to conceal gaps at the top
For permanent solutions:
– Consider replacing with properly sized custom blinds instead of compromising
– Upgrade to motorized options that eliminate the need for cords (which cannot be extended if too short)
– Contact the manufacturer for replacement parts if your blinds are still under warranty
For blinds with lift cords that are too short, replacement is typically the only viable solution, as splicing or extending cords rarely provides lasting results.