Your Venetian blinds hang too low. We see this weekly at Blindsgalore. Maybe you moved into a home with shorter windows. Your new blinds from Blindsgalore will fit. They’re custom made and they’re guaranteed to fit. Whatever brought you here, we’ll show you exactly how to shorten Venetian blinds with confidence.
Here’s the good news: Venetian blinds are actually the easiest window treatments to modify. After 25+ years helping customers, we know these blinds inside out. The design is simple. Slats, cords, rails. Nothing complicated. Just follow our steps and you’ll have perfectly sized blinds in under an hour.
How Do You Measure Windows Accurately Before Shortening Venetian Blinds?
Measuring correctly saves you from cutting twice. Here’s our foolproof method that works every time.
Grab a metal measuring tape. Fabric ones stretch and lie. Measure from the top of your window frame to where you want the blinds to end. For inside mount blinds, leave 1/4 inch clearance from the sill. Nobody wants that annoying scraping sound.
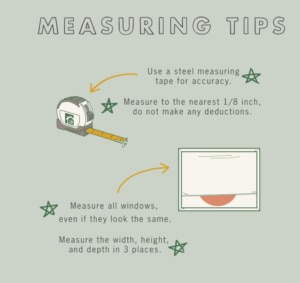
Measure at three points: left, center, and right. Windows aren’t always square, especially in older homes. Use the shortest measurement if mounting inside. Write down all three measurements. You’ll need these numbers when counting slats to remove.
For sliding glass doors, leave 1/2 inch clearance from the floor. Kitchen windows above sinks need extra consideration for faucet clearance. Bay windows? Measure each section separately.
Quick math: Each Venetian slat plus spacing equals about 1 inch. So if you need to shorten by 5 inches, you’ll remove approximately 5 slats. Simple as that.
What Tools Are Needed to Shorten Venetian Blinds According to the Guide?
You probably have everything already. No fancy equipment needed.
Essential tools:
- Flathead screwdriver (for end caps)
- Sharp scissors (for cutting cords if needed)
- Metal measuring tape
- Pencil for marking
- Small bowl for hardware
Helpful extras:
- Needle-nose pliers (stubborn clips)
- Masking tape (cord organization)
- Camera or phone (reference photos)
- Level (for reinstallation)
Set up on a clean, flat surface. Your dining table works great. Protect it with cardboard or an old sheet. Good lighting matters. Natural daylight works best, but a bright lamp helps too.
Keep that small bowl handy. Those tiny screws and caps disappear faster than socks in a dryer. Trust us on this one.
What’s the Visual Guide for Shortening Venetian Blinds at Home?
Pictures make everything clearer when you’re surrounded by blind parts. Let’s identify what you’re working with.
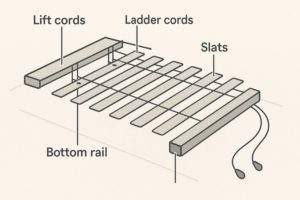
Main components:
- Lift cords: The strings that raise and lower your blinds
- Ladder cords: Horizontal supports holding each slat
- Bottom rail: Weighted bar at the bottom
- Slats: Individual horizontal pieces
Start by removing blinds from brackets. Press the release tabs gently. Every brand differs slightly, but most pop out with light pressure. Set them on your work surface with the front facing up.
The key to success? Understanding how these parts work together. Lift cords run vertically through holes in each slat. Ladder cords create the support structure. The bottom rail ties everything together. Mess with one component carelessly, and the whole system fails.
How Do You Remove Excess Slats from Venetian Blinds Step by Step?
Time for the main event. Follow each step carefully.
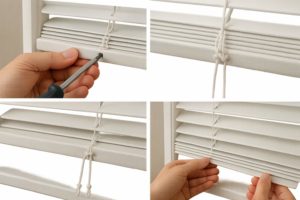
Step 1: Remove bottom rail caps Those plastic end caps pop off with gentle prying. Use your flathead screwdriver. Cup your hand over each cap while removing. They love to fly across the room otherwise.
Step 2: Free the ladder cords Look underneath the bottom rail. You’ll see ladder cords clipped or tied in place. Take a photo before touching anything. Seriously, take that photo. Unclip or untie carefully.
Step 3: Untie lift cords The lift cords thread through each slat and knot at the bottom rail. Study the knot type before untying. Usually it’s a simple overhand knot with extra wraps. Use needle-nose pliers if tight.
Step 4: Remove slats Count from the bottom up. If shortening by 5 inches, remove 5 slats. Slide each slat out sideways from the ladder cords. Work gently. Bent slats look terrible. Stack removed slats neatly. You might need them for another window.
Some Venetian blinds have route holes where lift cords pass through. Thread cords out carefully before removing those slats. Never force anything.
How Do You Untie and Re-tie Knots on Venetian Blind Cords When Shortening?
Cord work separates successful projects from tangled disasters. Let’s handle these carefully.
Look at the bottom rail underside. You’ll find lift cords knotted through holes. Before untying, study the knot pattern. Most use simple overhand knots with security wraps. Take photos from multiple angles.
After removing slats, your cords are too long. Don’t cut immediately! Thread them through your new bottom slat first. Pull cords taut but not stretched. You want slight tension, not guitar-string tightness.
Re-tying technique:
- Thread cord through bottom rail hole
- Tie overhand knot close to rail
- Wrap once more and pull snug
- Leave 1-2 inch tail
- Test with gentle tug
Never trim cords too short. Better to have extra length than discover you cut too much. Some folks ask about our cordless options. Great for safety, but a different process entirely.
How Do You Adjust Lift and Ladder Cords After Shortening Venetian Blinds?
Proper cord adjustment ensures smooth operation for years. Get this wrong, and you’ll fight your blinds daily.
After removing slats, check lift cord routing. Each cord should follow its original path through remaining slats. No crossing, no tangles. If cords seem twisted, now’s the time to fix it.
Ladder cords need equal tension on both sides. Uneven ladder cords cause crooked blinds. Reattach them to the bottom rail at identical heights. Use a level if you’re unsure. Small differences here create big problems later.
Testing checklist:
- Raise and lower several times
- Watch for smooth, even movement
- Check that blinds stay at set heights
- Look for consistent slat spacing
- Ensure no binding or catching
If something feels off, stop. Better to redo now than after mounting. We’ve seen too many rushed jobs that need complete do-overs.
What’s the Best Way to Prevent Fraying of Venetian Blind Cords After Trimming?
Frayed cords weaken quickly and look messy. Here’s how we prevent problems.
For synthetic cords (most common), use a lighter flame briefly on cut ends. Just a quick touch melts fibers together. Don’t overdo it. Melted blobs look worse than frays. Natural fiber cords? Clear nail polish works perfectly. Apply immediately after cutting.
Long-term cord care matters too. Handle gently during daily use. Dust buildup causes friction and wear. Monthly cleaning with a barely damp cloth keeps cords sliding smoothly. Check for wear signs regularly. Small nicks today become broken cords tomorrow.
Pro tip from our workshop: A tiny bit of cornstarch on cords helps them slide better. Just dust it on lightly. Too much creates a mess.
What Causes Uneven Venetian Blinds After Shortening? (Troubleshooting Guide)
Crooked blinds make everyone crazy. Let’s fix common problems.
One side hanging lower? Check ladder cord attachment heights. Even a quarter-inch difference shows. Verify you removed equal slats from each side. Sometimes we miscount when rushing. Ensure lift cords have matching tension.
Middle sagging? The center ladder string might be loose or twisted. Check for bent slats in the middle section. One warped slat throws off everything around it. The bottom rail might not be sitting level.
Won’t stay up? Lift mechanism could need adjustment. Cords might be too loose after modification. On older blinds, internal springs wear out. This usually means replacement time, not repair.
Most unevenness traces back to rushed reassembly. We know it’s frustrating, but taking everything apart and starting fresh usually fixes the issue. Patience now saves headaches later.
How Do You Shorten Venetian Blinds When They’re Too Long for the Window?
Sometimes blinds are dramatically too long. Like touching-the-floor long. Here’s our approach for major adjustments.
First, assess if it’s worth modifying. Removing more than 30% of blind length? Consider replacement. The proportions look wrong when you remove too many slats. The bottom rail seems too heavy. Everything appears squished.
For major shortening, work extra carefully. Remove slats in stages, checking appearance as you go. Take breaks to assess proportions. What looks right laid flat might seem off when hanging.
Special consideration for wide windows: Our Blindsgalore Vinyl Vertical Blinds or Blindsgalore Fabric Vertical Blinds might work better than horizontal Venetians for very wide openings. Vertical blinds eliminate sagging issues entirely.
Can You Shorten Venetian Blinds That Have Very Wide Slats?
Wide-slat Venetian blinds (2 inches or wider) need special handling. The weight distribution differs significantly from standard 1-inch slats.
Fewer slats mean each removal has a bigger impact. Removing three 2-inch slats equals six 1-inch slats in height reduction. The math matters here. Calculate carefully before starting.
Support wide slats fully when removing. They bend easier than narrow ones. Work with a helper if possible. One person holds while the other slides slats out. This prevents damage and frustration.
Some wide-slat blinds feature decorative tape. This adds complexity. You’ll need to carefully detach tape from removed slats, then reattach to your new bottom slat. Use fabric glue if original adhesive fails.
Our Bali Vinyl Vertical Blinds offer another option for large windows. No slat removal needed. Just trim vane length if required.
What Safety Considerations Apply When Shortening Venetian Blinds with Children in the House?
Child safety always comes first at Blindsgalore. Extra precautions matter when modifying blinds in homes with little ones.
During modification: Work in a locked room away from curious hands. Store tools immediately after each use. Keep removed slats out of reach. Sharp edges and small parts create hazards. Never leave loose cords accessible.
After modification: Check that shortened cords don’t create new loops or hazards. Install cord cleats at adult height. Test all mechanisms before reinstalling. Consider upgrading to cordless while you’re at it.
Window covering safety isn’t optional. We offer free consultations about child-safe options at (877) 702-5463. Our experts help you choose the safest solutions for your family.
Remember, traditional corded products were banned in USA/Canada as of June 2024. While some corded options remain compliant, we strongly recommend cordless or motorized products for homes with children and pets.
What Tips Ensure Smooth Operation of Shortened Venetian Blinds?
Getting blinds to work smoothly after shortening requires attention to detail.
Proper cord tension tops the list. Too tight binds the mechanism. Too loose creates sloppy operation. Find the sweet spot where blinds raise and lower without effort but stay where positioned.
Keep mechanisms clean. Dust buildup in the headrail causes sticking and uneven operation. Use compressed air monthly to clear debris. Never use water or liquid cleaners on mechanisms.
Maintenance schedule we recommend:
- Weekly: Quick dusting with microfiber cloth
- Monthly: Check cord condition and clean mechanisms
- Quarterly: Test all operations and adjust as needed
- Yearly: Deep clean slats (no water submersion!)
Operate blinds gently. No yanking or forcing. Smooth, steady movements keep everything aligned and working properly.
How Do You Clean Shortened Venetian Blinds Effectively?
Clean blinds last longer and look better. Here’s our proven cleaning method.
For regular cleaning, close blinds flat. Dust with a microfiber cloth, working top to bottom. Flip slats and repeat. For stubborn dust, use your vacuum’s brush attachment on low suction. Support slats while vacuuming to prevent bending.
Deep cleaning process:
- Remove blinds from window if needed
- Lay flat on protected surface
- Wipe each slat with slightly damp cloth
- Dry immediately with clean towel
- Clean cords with barely damp cloth
Never spray cleaners directly on blinds. Apply to cloth first. This prevents liquid from entering mechanisms. Remember our golden rule: never submerge blinds in water. Not even “waterproof” materials. Water destroys internal parts every time.
What Are Best Practices for Maintaining the Cords of Shortened Venetian Blinds?
Cords are your blinds’ lifeline. Proper care extends their life significantly.
Daily use matters. Pull straight down, not at angles. Angled pulling creates uneven wear. Use steady, smooth motions. Keep hands clean when operating. Oils and dirt transfer to cords, causing deterioration.
Check cords monthly for fraying or wear. Look closely where cords pass through slats. These friction points wear first. Clean cords with a barely damp cloth when dusty. Apply a tiny amount of cornstarch for smoother operation.
Replace cords at first sign of serious wear. Don’t wait for complete failure. Broken cords usually happen at the worst possible time. Like when you’re rushing to get ready for work.
Making the Right Choice for Your Windows
You now know exactly how to shorten Venetian blinds like our pros do. The process takes patience but saves money and reduces waste.
That said, custom-made blinds eliminate these hassles entirely. At Blindsgalore, we craft each blind to your exact specifications. With free samples to touch and feel before ordering, expert guidance at (877) 702-5463, and our industry-leading guarantee, getting perfect-fitting blinds has never been easier.
Our family has been helping customers since 1998. We offer free exchanges within 30 days for any reason, covering up to four windows per household. Why struggle with modifications when you can have blinds that fit perfectly from day one?
Ready to skip the DIY route? Check out our complete measuring guide or explore our custom Venetian blind options. Your windows deserve that perfect fit. And with free shipping across the continental U.S. and products ready in 5-7 business days, you’ll have beautiful blinds faster than you think.
Frequently Asked Questions
We strongly advise removing blinds first. Working on mounted blinds risks injury and poor results. Plus, you need a flat surface to work properly. Safety and accuracy matter more than saving five minutes.
Yes, modifications void manufacturer warranties. Our Blindsgalore products come with a free 3-year warranty (upgradeable to 5 years) that covers defects, but not alterations or fading. Consider this before modifying newer blinds.
You can remove up to 30% of the total length without major issues. Beyond that, proportions look off and mechanisms may not work properly. For drastic size changes, new blinds work better.
Unfortunately, short cords can’t be extended reliably. You’ll need to restring the entire blind or replace it. This is why we stress measuring twice, cutting once. When in doubt, leave cords longer.
The basic process is identical. Metal slats can have sharper edges, so handle with extra care. Vinyl is more forgiving. Both follow the same removal and reassembly steps we’ve outlined above.