We’ve all seen it while navigating our way through Pinterest. On the hunt for that perfect project to complete over the weekend, you sift with purpose to find a DIY that couldn’t possibly result in failure. The results can fall one of two ways, with a 50/50 shot at success. It’s the risk we all take when venturing into DIY, diving into creating something without building a skill prior to attempting. I’ve had my share of Pinterest Fails. It just looks so easy to get the carefully styled results in a glossy finish. The appeal is enough to make us believe it will be flawlessly easy with perfect execution, but the reality is much different. With that said, let’s talk DIY roman shades. I have already in another blog covered how to make romans from scratch, but what to do about the tired shades hanging in your window that you’re considering tossing? Let’s try to give those shades new life and if it results in failure at least you can say you tried to save them. Here are a few ways to revive roman shades and take them from drab to fab.
Tie Dye It
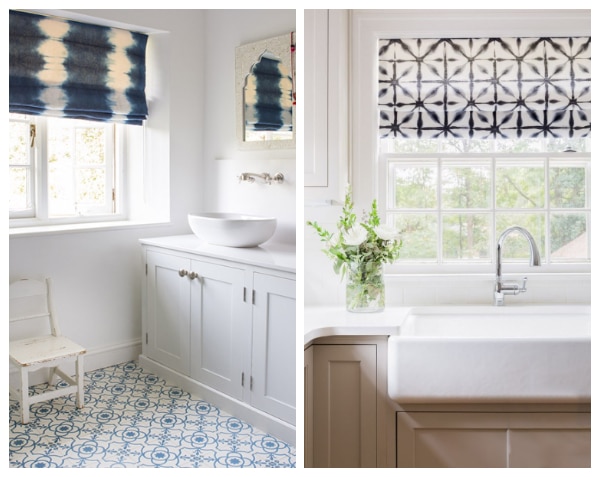
Shibori is a Japanese dyeing technique that typically involves folding, twisting or bunching cloth and binding it, then dyeing it in an indigo bath. This technique is the base which common day tie dye was born. It has experienced a resurgence in interest over the past handful of years and is a timeless way to add an eclectic look to the home. This style of dying can be applied to other colors outside of indigo so if you want multihued tie dye, go for it! No judgment. Keep in mind the technique will be different and instead of giving your fabric a full bath, you will want to utilize a spray bottle with hot water and dye to layer the color on.
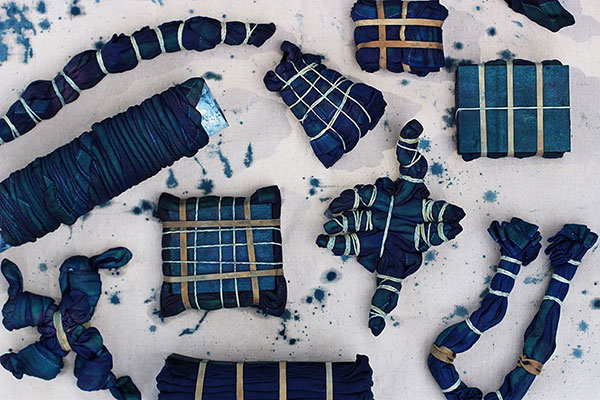
Tie-dyeing a roman shade can be a bit difficult due to the bulk of fabric so I highly recommend testing the containers for your dye bath prior to filling them to make sure your shade will fit and can be submerged to dye. There is an excellent tutorial on shibori dyeing here to get you started.
Stencil It

Out of all the ways to modify an existing shade, I find stenciling to be the most widely accessible next to iron-on decals. The variety of options available online makes finding the style you are seeking a breeze; just click til your heart’s content. A stencil creates an interesting pattern and provides much more control and precision than freehand or tie dye. You can use one color for a clean, modern look or layer the colors on creating a palette to define your space or add a pop of interest. I have a few tips to guide you along and make stenciling a manageable task.

- 1. I recommend sourcing a stencil from a reputable brand to ensure clean cuts and a sturdy work surface. Royal Design Studio has a wide selection of styles to choose from as well as the materials needed to complete your project.
- 2. Make sure you practice, practice, practice. I don’t think I can stress this step enough. Grab a couple of oversized pieces of cardboard and do at least one test run. Remember that you get one shot at stenciling on the actual shade and although you may feel confident to just jump in, trust me and learn from my mistakes.
- 3. Paint options are pretty limitless for this kind of project considering that you can use house paint, and even spray paint, if you like. Interior paint will offer the broadest collection of colors but is not fabric fast so if you plan on washing your shade in the future, I would recommend fabric paint.
Revamp It
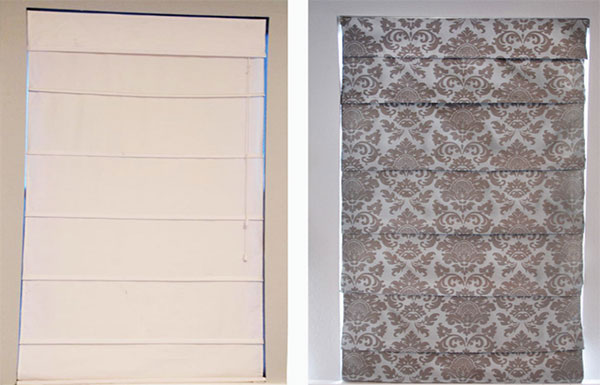
You’ve had it with your existing shade and there is just no saving it by tie-dyeing or stenciling. Fret not, friend. I have just the fix for you! Cover your existing shade with new fabric using Fabri-Tac fabric glue or hem tape. These no-stitch options work wonders if you don’t have a sewing machine or are feeling just too stressed for time to stitch everything before gluing it in place. Simply select your fabric, cut it about 3-4 inches wider/taller than the existing shade and glue. Well, there are a few more steps, but it should take you less than two hours to complete one shade. The most helpful tip I can offer is to make sure to measure and iron before gluing anything down. The iron creates a clean pleat that will give a more professional look at the end.
Regardless if you are a novice or a seasoned DIY pro, one thing is certain and that is that DIY is not as easy as pictures portray. Be brave, give it your best and be kind with the results. Even if you make a mess of your existing shade, have peace of mind that we are always here to help warm your windows with new shades to update your view.